
![]() Carregar nova foto
para Tauranga Bay
|
por outro lado surf break
Carregar nova foto
para Tauranga Bay
|
por outro lado surf break
| 3 hours earlier |
Peak Waves | Wind | Wind Waves | Swell 1 | Swell 2 | 3 hours later |
|---|---|---|---|---|---|---|
|
WSW |
E |
WSW |
NNW |
|||
| 12 s | glass | 12 s | 7 s |
Open ocean wave model on 3 May at 12 pm
Forecast wind and swell just offshore from Tauranga Bay around the time the photo was taken
| 3 hours earlier |
Peak Waves | Wind | Wind Waves | Swell 1 | Swell 2 | 3 hours later |
|---|---|---|---|---|---|---|
|
WSW |
E |
WSW |
NNW |
|||
| 12 s | glass | 12 s | 7 s |
Open ocean wave model on 3 May at 3 pm
Forecast wind and swell just offshore from Tauranga Bay around the time the photo was taken
| 3 hours earlier |
Peak Waves | Wind | Wind Waves | Swell 1 | Swell 2 | 3 hours later |
|---|---|---|---|---|---|---|
|
WSW |
ENE |
WSW |
NNW |
|||
| 12 s | glass | 12 s | 7 s |
Open ocean wave model on 3 May at 6 pm
Forecast wind and swell just offshore from Tauranga Bay around the time the photo was taken
| 3 hours earlier |
Peak Waves | Wind | Wind Waves | Swell 1 | Swell 2 | 3 hours later |
|---|---|---|---|---|---|---|
|
WSW |
ENE |
WSW |
NW |
|||
| 12 s | glass | 12 s | 7 s |
Open ocean wave model on 3 May at 9 pm
Forecast wind and swell just offshore from Tauranga Bay around the time the photo was taken
| 3 hours earlier |
Peak Waves | Wind | Wind Waves | Swell 1 | Swell 2 | 3 hours later |
|---|---|---|---|---|---|---|
|
WSW |
ENE |
WSW |
NNE |
|||
| 12 s | glass | 12 s | 6 s |
Open ocean wave model on 4 May at 12 am
Forecast wind and swell just offshore from Tauranga Bay around the time the photo was taken
| 3 hours earlier |
Peak Waves | Wind | Wind Waves | Swell 1 | Swell 2 | 3 hours later |
|---|---|---|---|---|---|---|
|
WSW |
ENE |
WSW |
N |
|||
| 12 s | glass | 12 s | 6 s |
Open ocean wave model on 4 May at 3 am
Forecast wind and swell just offshore from Tauranga Bay around the time the photo was taken
| 3 hours earlier |
Peak Waves | Wind | Wind Waves | Swell 1 | Swell 2 | 3 hours later |
|---|---|---|---|---|---|---|
|
WSW |
ENE |
WSW |
N |
|||
| 12 s |
cross- off |
12 s | 6 s |
Open ocean wave model on 4 May at 6 am
Forecast wind and swell just offshore from Tauranga Bay around the time the photo was taken
| 3 hours earlier |
Peak Waves | Wind | Wind Waves | Swell 1 | Swell 2 | 3 hours later |
|---|---|---|---|---|---|---|
|
WSW |
NE |
WSW |
N |
|||
| 12 s |
cross- off |
12 s | 7 s |
Open ocean wave model on 4 May at 9 am
Forecast wind and swell just offshore from Tauranga Bay around the time the photo was taken
| 3 hours earlier |
Peak Waves | Wind | Wind Waves | Swell 1 | Swell 2 | 3 hours later |
|---|---|---|---|---|---|---|
|
WSW |
NE |
N |
WSW |
N |
||
| 12 s |
cross- off |
7 s | 12 s | 13 s |
Open ocean wave model on 4 May at 12 pm
Forecast wind and swell just offshore from Tauranga Bay around the time the photo was taken
| 3 hours earlier |
Peak Waves | Wind | Wind Waves | Swell 1 | Swell 2 | 3 hours later |
|---|---|---|---|---|---|---|
|
WSW |
NNE |
N |
WSW |
N |
||
| 12 s | cross | 7 s | 12 s | 14 s |
Open ocean wave model on 4 May at 3 pm
Forecast wind and swell just offshore from Tauranga Bay around the time the photo was taken
| 3 hours earlier |
Peak Waves | Wind | Wind Waves | Swell 1 | Swell 2 | 3 hours later |
|---|---|---|---|---|---|---|
|
WSW |
NNE |
N |
WSW |
WSW |
||
| 12 s | cross | 7 s | 12 s | 22 s |
Open ocean wave model on 4 May at 6 pm
Forecast wind and swell just offshore from Tauranga Bay around the time the photo was taken
| 3 hours earlier |
Peak Waves | Wind | Wind Waves | Swell 1 | Swell 2 | 3 hours later |
|---|---|---|---|---|---|---|
|
WSW |
NNE |
N |
WSW |
WSW |
||
| 12 s | cross | 7 s | 12 s | 21 s |
Open ocean wave model on 4 May at 9 pm
Forecast wind and swell just offshore from Tauranga Bay around the time the photo was taken
| 3 hours earlier |
Peak Waves | Wind | Wind Waves | Swell 1 | Swell 2 | 3 hours later |
|---|---|---|---|---|---|---|
|
WSW |
NE |
N |
WSW |
WSW |
||
| 12 s |
cross- off |
8 s | 12 s | 20 s |
Open ocean wave model on 5 May at 12 am
Forecast wind and swell just offshore from Tauranga Bay around the time the photo was taken
| 3 hours earlier |
Peak Waves | Wind | Wind Waves | Swell 1 | Swell 2 | 3 hours later |
|---|---|---|---|---|---|---|
|
WSW |
NE |
E |
WSW |
N |
||
| 13 s |
cross- off |
2 s | 13 s | 8 s |
Open ocean wave model on 5 May at 3 am
Forecast wind and swell just offshore from Tauranga Bay around the time the photo was taken
| 3 hours earlier |
Peak Waves | Wind | Wind Waves | Swell 1 | Swell 2 | 3 hours later |
|---|---|---|---|---|---|---|
|
WSW |
NE |
N |
WSW |
N |
||
| 16 s |
cross- off |
8 s | 16 s | 8 s |
Open ocean wave model on 5 May at 6 am
Forecast wind and swell just offshore from Tauranga Bay around the time the photo was taken
| 3 hours earlier |
Peak Waves | Wind | Wind Waves | Swell 1 | Swell 2 | 3 hours later |
|---|---|---|---|---|---|---|
|
WSW |
NE |
NNE |
WSW |
N |
||
| 15 s |
cross- off |
7 s | 15 s | 8 s |
Open ocean wave model on 5 May at 9 am
Forecast wind and swell just offshore from Tauranga Bay around the time the photo was taken
| 3 hours earlier |
Peak Waves | Wind | Wind Waves | Swell 1 | Swell 2 | 3 hours later |
|---|---|---|---|---|---|---|
|
WSW |
ENE |
WSW |
N |
|||
| 15 s |
cross- off |
15 s | 7 s |
Open ocean wave model on 5 May at 12 pm
Forecast wind and swell just offshore from Tauranga Bay around the time the photo was taken
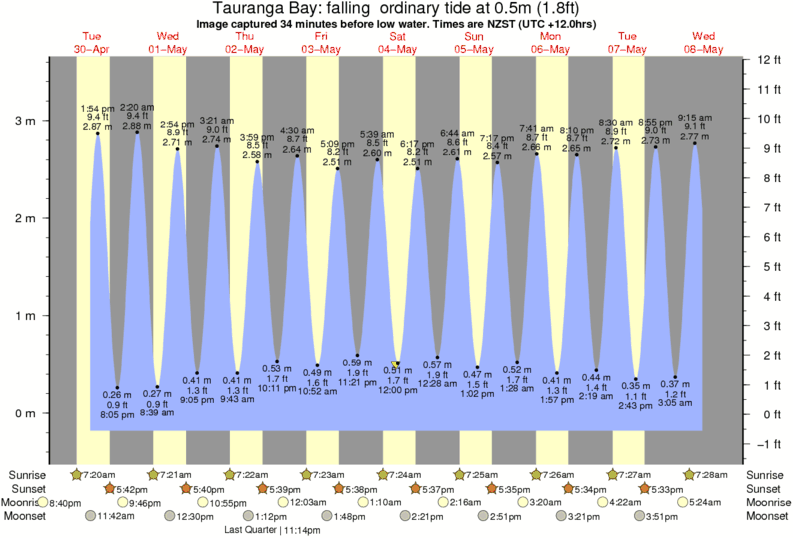
Image captured 34 minutes before low water (falling ordinary tide). Tide height was 0.5m (1.8 ft). Range 3.49m (11.5 ft). Toggle tide graph

Tauranga Bay Foto de Surf: 'Low tide right' por Rob Davies
Occasionally breaks right. Fading swell but still ok.
 Nearest